Last year, I had a bag (of diapers, water, snacks, and sunscreen), an umbrella slung over my shoulder (thankfully it has a case with a strap), towels under my arm (4 of them), and a bucket of sand toys in my hand. My other hand was free to grab three little hands to cross the street. I was a sight. I'm sure the people that saw me walking with my three kids to the beach felt really sorry for me. Ha!
I decided, then, that I would get a big beach bag for this year. And of course, being a do it yourself gal, I had to make one. I found a piece of canvas type fabric on clearance at JoAnn's for about 7 bucks. I knew I wanted a BIG bag, but I didn't want it so big that I wouldn't be able to actually carry it once it was full of stuff. I based my bag on the one on this site, but as you will see, I made some changes.
I was shocked at how quickly this bag came together. I completed it, including taking pictures of each step for this blog, before my kids were finished watching Dora the Explorer's Pirate Adventure. (For those of you without kids, that translates to "less than an hour.")
Please feel free to make this bag and post about it. Just remember to credit me and link back to this post! Enjoy!!
Supplies
1 1/2 yards of fabric (44" wide)..... less if your fabric is 54" wide
***Please note that you may have to adjust the amount of fabric you buy depending on the print on your fabric. Make sure you have enough fabric to fold it in half, resulting in a piece that is 27 inches tall and 30 inches wide.
2 yards cotton webbing (for straps).... you could make these straps out of fabric if you do
not have webbing

Fold your fabric in half so that the fold is the bottom of the bag. If you have to sew two pieces, rather than fold the fabric, just sew it together while you are sewing the side seams.
Cut your fabric 30 inches wide. Cut off the top (not the folded edge) to make the bag 27 inches tall.
Fold the fabric the same way but right sides together. Pin the sides.

Sew the sides with a 1/2 inch seam. Then, zigzag along the edge to keep the seams from fraying.

At the bottom corner (where the folded edge meets the side seam), spread out the fabric to make a triangle. This step is hard to describe, but you pull on the fabric on either side of the seam and then lay it flat on the table. You can see in the picture below that the "side seam" is in the center and on top of the rest of the fabric. Pull on the sides until there is an equal amount of fabric on either side of the seam.

Find the spot that is 9 inches across the triangle that you just made (adjusting the fabric to make sure that it is 4.5 inches on either side of the seam (aka. the seam in centered).

Mark this line and then pin it so the fabric won't move.
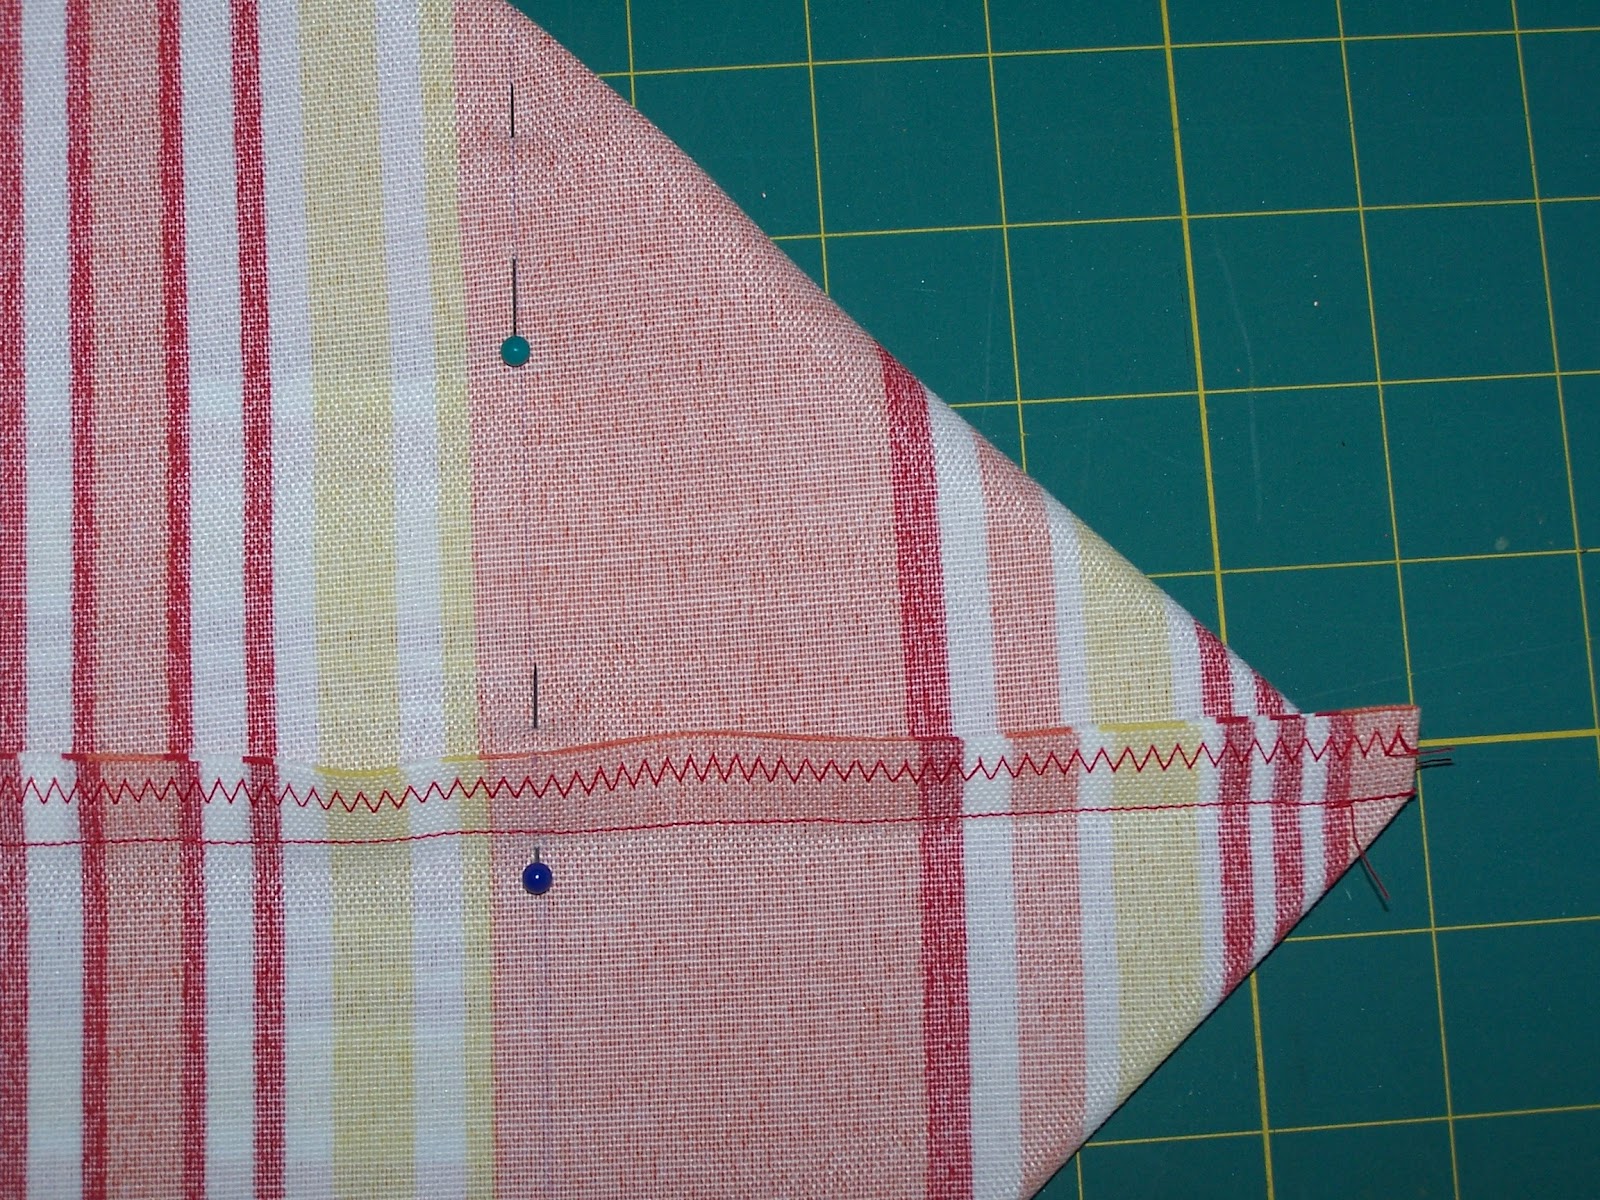
Sew along the line. Then, zigzag right next to the line (on the side of the line closes to the point of the triangle).

Trim off the extra fabric past your new zigzag line.

I turned my bag right side out at this point. Here is a picture of the new bottom "corner" looking down into the bag.

Here is a picture of the new bottom "corner" from the outside.

Now fold down 3 inches along the top edge to the inside of the bag. Pin it.

Fold under 1/2 inch along the raw edge. Pin it.

Sew close to the folded edge. (The LOWER edge, not the top edge of the bag). You can't really see the seam in this picture, but there is a faint red stitch line in the first yellow stripe.

Cut your webbing into two straps. I didn't have quite 2 yards, but it worked just fine. Adjust the length if you want longer or shorter straps. Fold under each edge of the webbing and stitch to finish the edge and keep it from fraying. (My stitching in this picture is VERY crooked. But I'm not worried since it's just a beach bag and this stitching is on the inside.) Mark on the INSIDE top edge of the bag, 8 inches from the seam on each side. On the INSIDE of the bag, position your straps on the "inside" (toward the center of the side) of these marks, making sure that your webbing is not twisted from one side to the next. Pin in place.

Tack the straps in place by sewing around the four sides and then make an X across for stability and strength. You do not want your straps to fall off.

Topstitch around the entire bag close to the top edge. I then topstitched around at the bottom of my X marks for extra stability. (This makes 3 stitch lines at the top of your bag).

Tada!! This picture shows the bag with 6 towels in it!! And plenty of room to spare!

And just so you can get an idea of the actual size of the bag, my 6 year old son was kind enough to take this picture of me holding the bag. (Please ignore the dress that COMPLETELY clashes with the bag, LOL!)

No comments:
Post a Comment
Thank you for taking the time to comment on my post!